I'm going to have to do this...so awesome! Hopefully I can just make a small one and still have success with it.
Thursday, September 22, 2011
Friday, September 16, 2011
The red/black quilt is finished!
Well, the quilt is finally complete. I'm satisfied with it, though unhappy with several mistakes. On the other hand, I feel this was another major learning experience and I know some of the things to avoid for next time. I was very pleased when my husband commented on how much he liked it and asked me to make one for our family room. I'm glad he's confident in my work and now I'm looking forward to the next one (though I have several other things to work on before that!).
Here are some photos of the final process, in case anyone is interested.
After finishing the piecing, I started the quilt sandwich. Here's a photo of the three layers: the backing (I ended up going simple with a super soft sateen fabric) , the batting (I used a very low-loft) and the quilt face (? not sure what else it's called). After arranging the three, I pinned them together with safety pins. Note to self: buy more safety pins!

I trimmed the backing and batting a bit and then took it back to the sewing machine for quilting. I felt a little more confident in straighter rows this time, so decided to do more stitching in the ditch. I'm a long way off from being able enough to quilt designs, but I'm happy with the straight rows, particularly with a more modern looking quilt like this one.
The last step was to add the binding. On the robot/monkey quilt I ended up hand sewing the binding because I didn't know any better. It took me a week of sewing constantly to get it done because my inexperienced self made the most ridiculously tiny stitches. This time I decided to machine sew it on and it not only looked much better, it was much easier. The only problem I ran into here was trying to keep the binding on the sandwich in the process. This was (mostly) solved by using snap clips.

They worked great and I only had to fix a few places.
After that I just had to wash it and clip some ends. Here's the end result:


And the coordinating tag blanket:

Some mistakes I will try not to make next time:
1) When sewing the blocks together, make sure all the blocks in a row stretch in the same direction
2) If I'm going to use white, apply fray check early and often, and use a thicker white fabric. If you look close enough you can see a lot of frayed fabric in there.
3) When adding the sashing, quadruple check the length of the sash before cutting it and make sure it goes to the end of the row (though the red squares were a happy fix).
Yesterday I received a new AccuQuilt die in the mail: Circles. Time for my next project!
Monday, September 12, 2011
Quilt making - an acceptable birthday activity
Saturday was my birthday and I decided to spend a lot of it working on the red/black quilt as I knew my husband would be running kid interference for most of the day. Unfortunately it ended up being a rather frustrating process as I proceeded to make error after error. The best I can say is that I have learned much about quilt making, the worst is that I have a ton more work to do before I'm finished. :)
Last week I was at my friend Jana's house working on the quilt. She has a LOT more patience than I do when it comes to crafting so was instrumental in helping me focus on fixing some errors I had already made. We noticed that the black squares were smaller than the other squares and that threw off row alignment. A few times we had to cut new black squares and resew the rows. In the end, each row had to be resewed and it wasn't until Saturday when I realized why they were a problem. After all, I had cut everything with the Accuquilt, so how could the black squares be smaller?
I turns out that ironing the black squares caused them to shrink and distort. The other fabric didn't have that issue, but the black did. This became apparent when I was ironing down the seam on a piece of the sashing:

So that added quite a bit more work. :)
Once I finished sewing on the sashing I realized that I had made an error by not making them long enough for the corners and one of them was just plain too short:

 Those were pretty pathetic mistakes and made by someone who really should have just taken a break for the day. :) The good thing is that I was inspired to sew red squares onto the corners which I think will really make it pop.
So the next step is to sew on the red squares, do some end snipping and fray checking and figure out what I'm going to do for the backing.
I also ended up unhappy with the 75% completed matching tag blanket. And I am rapidly running out of time.
I'd like to add that having a fraction of my chair to sit on while sewing doesn't help the process!

Last week I was at my friend Jana's house working on the quilt. She has a LOT more patience than I do when it comes to crafting so was instrumental in helping me focus on fixing some errors I had already made. We noticed that the black squares were smaller than the other squares and that threw off row alignment. A few times we had to cut new black squares and resew the rows. In the end, each row had to be resewed and it wasn't until Saturday when I realized why they were a problem. After all, I had cut everything with the Accuquilt, so how could the black squares be smaller?
I turns out that ironing the black squares caused them to shrink and distort. The other fabric didn't have that issue, but the black did. This became apparent when I was ironing down the seam on a piece of the sashing:

So that added quite a bit more work. :)
Once I finished sewing on the sashing I realized that I had made an error by not making them long enough for the corners and one of them was just plain too short:


So the next step is to sew on the red squares, do some end snipping and fray checking and figure out what I'm going to do for the backing.
I also ended up unhappy with the 75% completed matching tag blanket. And I am rapidly running out of time.
I'd like to add that having a fraction of my chair to sit on while sewing doesn't help the process!

Tuesday, September 6, 2011
More work on the black/red quilt
I fought with my sewing machine throughout the weekend and managed to get some of the quilt done. However, it got so bad in the end (examples below) that I had to stop. Luckily, I have a couple of friends who are willing to let me borrow their machines until I finish the project. Not sure where to go from here with my machine. I can take it back in for repair or, if I ask Dan nicely enough, maybe eventually get a new, better machine. Preferably one without a plastic bobbin race. My first step, regardless, is to see if the repair place has a warranty on their work.
I managed to get a bit of sewing done though the machine would start to pull in fabric and I'd have to clean it out a few times and leave it for a couple hours before it would stop that mess. And now, no matter what, it does what you see below.


I managed to get a bit of sewing done though the machine would start to pull in fabric and I'd have to clean it out a few times and leave it for a couple hours before it would stop that mess. And now, no matter what, it does what you see below.


Anyway, I managed to get a little done, mostly sewing the white rows onto the blocks and then the blocks together:


I finished up last night by pinning the outside (and inner) white rows onto the block rows. After I finish sewing those, I have to do the outer sashing and then I'll start working on the quilt sandwich. I had hoped to be further along at this point, but my machine had different ideas.
So did this guy:

Other craft stuff I'm working on
I've made a new wreath! It's simple but I love it. This one cost about $11, and maybe it looks it, but I really dig that I can make my own. Now I have to wait impatiently for it to be appropriate to put out a fall-themed wreath. I'm not 100% sold on the pumpkin but it needed "something".


I've also been working on a lot of bows. I wanted Lauren to have some bows that would match her school uniforms (and yes, I was hoping some other moms would notice and inquire about who made them!) plus I wanted to make some University of Michigan so she's all set for the new season. :) I was also asked by my dear friend Michelle to make a bow to match one of her daughter's dresses. Here are some photos of the end results:
Lauren's school bows


Dress bow


Sunday, September 4, 2011
Yep, I bought a Renaissance Faire costume.
This isn't a post about crafting or fish, or even the kids, but definitely something that goes with the motivation of this blog as I clearly chose to, once again, "jump in with both feet".
Yesterday we went to the Renaissance Faire for what is turning out to be a yearly tradition. Because we didn't know about it last year and regretted not going, we bee-lined for the pub crawl tickets first thing. The pub crawl was fantastic (and hilarious) and will keep me going yearly to the Faire.
The guys kept joking throughout the day about having us gals try on and buy matching corsets. I figured it would be worth trying one on as I never had before and honestly, I was instantly in love. I had no idea it would feel so good to wear a corset (with steel boning, no less) and even though I was not happy about spending the money, I had to get it. BUT, it didn't end there. Of course not. No, I had to buy a flouncy top and plaid skirt to go with it. Now I have to figure out when to wear it and make it worth the cost! I imagine Halloween would work and, of course, our yearly Faire pub crawl. I imagine even a night out to a concert would work, as long as I didn't have to sit. :D
And now I'm sitting here trying to decide whether to post a picture of me in the outfit, or even to post this at all. The teasing from my family might be relentless!
Next year, I'm getting a small hat. :)
Friday, September 2, 2011
Work on the quilt has (finally) begun.
I have a lot of catching up to do, which I will do over the course of this weekend (I hope). I've been working on a lot of smaller projects that, combined with ots of craziness, have delayed work on the quilt. But today I got back into it in earnest and I hope to dedicate a large part of the holiday weekend working on it.
Anyway, today I worked on ironing and cutting, two things I hated doing until I got my Accuquilt Go. Though I think I might need to consider investing in a new ironing board. I still have this one from my university days:


 It still took me a couple hours, but I know I made better cutting decisions, had less waste, and managed to get enough done to be prepped for a matching taggie blanket!
So on to the next step, pinning.
Anyway, today I worked on ironing and cutting, two things I hated doing until I got my Accuquilt Go. Though I think I might need to consider investing in a new ironing board. I still have this one from my university days:

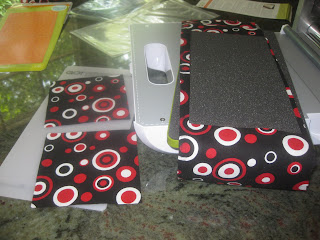
Anyway, I thought I would show off the Accuquilt Go a little bit, in case people are interested and not familiar with it. I am a terrible, terrible cutter. I even attempted to use a rotary cutter and it didn't help me much. I still have to use it a bit with the Accuquilt, but mostly for prep, and as a result my cuts are MUCH more uniform.

Step 1: Cut fabric into strips so it can better fit onto the die.

Step 2: Arrange strip on the die with the cutting mat.

Step 3: Run it through the cutter

And voila!
So here's the end result with that small pile being the only scrap.

So on to the next step, pinning.
Subscribe to:
Posts (Atom)