Tuesday, July 24, 2012

My Crafty Summer - Day 20 - Some Finished Items

Here are a few items I completed mostly for family and friends.  

A couple of butterfly hair clips.  It's hard to tell but they are baby pink.

Finally, a Hello Kitty hair clip for Lauren.  She was thrilled.  This one is red and baby pink.

A few clips I made for a niece.  The "J" is resin and the cupcake and Minnie are clay.  

A couple rings.  In the future I will give them a polymer clay disk "base" like I did with the J above.  A much nicer look.  These are resin.

LSP and the sword.  I managed to glue it back together but it won't be able to withstand keychain usage.  I'll try again another time.


Friday, July 20, 2012

My Crafty Summer - Day 19 - Some clay and resin

Day 19 was a pretty frustrating day, craft-wise.  I ended up being disappointed with 99% of what I made, but I was doing a little more experimenting and should have expected some badness. It was a late night spent pouring more resin and making a couple clay items.  I also made a few clips, but I'll show finished products another day.

So, here's what I made:
I was excited about making my first bangle.   It's hard to make out in this picture, but it's black with some holographic glitter.  It hasn't been finished or "glazed" as it hasn't completely cured but I'm thinking this is the first of many.  It was also the first of many disappointments.  I must have gotten distracted (I was pissy last night because our cable wasn't playing On Demand and I couldn't watch  more Game of Thrones) because I was planning on adding clear glitter and black flocking powder to the clear resin and ended up with this.  Yikes.  It's not something I will wear, but Lauren will love it.

Disappointment #2.  This was the culmination of two experiments.  I absolutely cannot find San-X stickers locally.  So I decided to print out some online stuff and seal it with Mod Podge.  That, at least, was a success.  My ability to cut straight lines and keep it centered, not so successful. I also stylistically made a bad decision with a rectangle in a square and the list goes on.  I also tried to replicate a background I've seen online called "cake batter".  I think it was mostly successful. It seems to be a closely guarded secret how to do it, but I just added white pigment to a ton of candy sprinkles and let it set for a really long time.  It was insanely sticky when I put it in the mold which is why the "M" didn't turn out well...it didn't fill the mold completely.

Original
Original
These were a success!  You might remember these from a couple pours ago, but I finally "glazed" them by putting a layer of resin over the top.  They're so so so much shinier.  My camera is so terrible that it's hard to see, but I'll show them in a video later.


It's hard to see how this looks from the photo, but my camera has a really hard time with white.  I basically mixed in some white pigment powder and a bit of black and orange flocking powder.  It's only ok.  There were some bubbles at the ends that popped and left major voids. I'm not happy about that.
 
Two more crysanthemums with the cake batter and just black.  I like them but will want to glaze them.

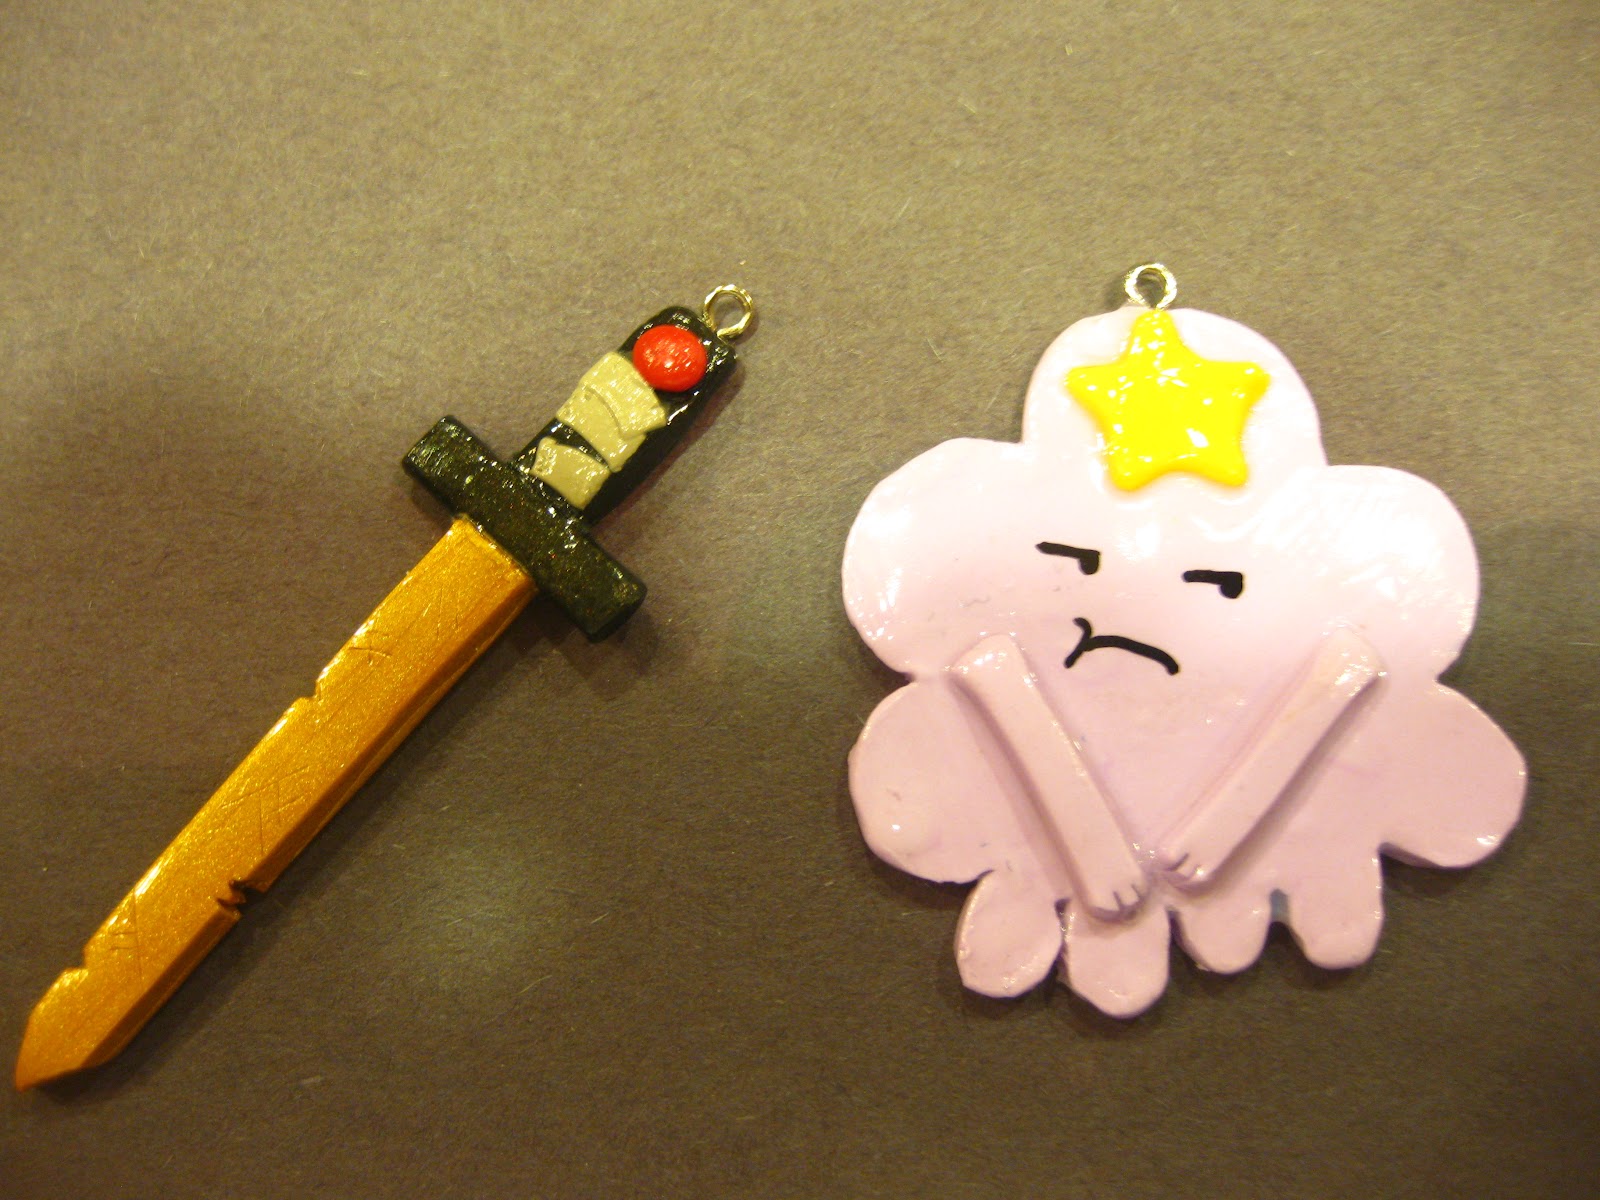
I thought I wold make a Lumpy Space Princess out of polymer clay.  For some reason (maybe I didn't condition it enough) the clay was extremely pliant after baking.  You might be able to make out the major rip on the right side after I pulled it out of the oven.  I wasn't happy, but I have since made another.  I'll show it later when done.
I also made Finn's sword which I thought ended up being AWESOME.  Unfortunately, it was also pretty pliant and broke into three pieces later.  I'm hoping I can put it all back together with some glue.  I was so proud of it. :(


I was most excited about this last piece and frankly all the errors/problems I had were made up for with this. This was another print out that I coated with Mod Podge.  I put a thin coat of resin in and allowed it to dry all night.  In the morning I added a black pigmented background coat.  You can see the layers in the bottom picture.  I couldn't be more excited about this.  I will absolutely be turning this into something for me to use.  YAY!


Thursday, July 19, 2012

My Crafty Summer - Day 18 - Media Comparison

Currently I'm using three types of media for jewelry and cabochons/clip centerpieces: Polymer clay, cold porcelain and resin.  I'm finding that each has it's own positives and negatives and I thought I would take a moment to compare them.


The ring on the left was made with resin mixed with pink flocking powder and the right is polymer clay.  Very different looks though I think the resin looks more "professional" looking.  I'll make another one eventually with a solid color to get a better comparison.


The left HK was made entirely with polymer clay, middle is cold porcelain and the right is resin. It's pretty clear that the cold porcelain shrinks when it dries.  That's a bit of a problem, though I still like how easy it is to use and keep clean.  As I mentioned previously, I try to shy away from white polymer clay and I had tried to use red clay for the bow but it bled and ended up looking pretty terrible.  So I think in a pinch when size doesn't matter too much, I'll use the cold procelain.  When I have time, I'll definitely use resin.  I haven't tried painting it yet because I need to put another layer of resin on top to give it more of a shine, but I have put some paint on another piece (below) and it looks like it'll work just fine.


The top hair clip is polymer clay and the bottom is resin mixed with flocking powder.  It's hard to see the detail in the bottom clip because of the glare, but I think it's a very nice look.  Not too much to say about this comparison.  Honestly, when I bought the mold I had always wanted the look I achieved with the resin, so I will likely continue to go that route.
The two letters on the left are resin and the two on the right are polymer clay.  The bottom right has been glazed, the top has not.  I'm torn on these.  I like the detail of the polymer clay but I like the crisp lines of the resin.  Plus, so sparkly!  It doesn't help that the polymer clay "L" got broken somewhere along the line, something that won't happen with resin.  Jury is still out, but for the time being I'll probably go with resin if I have the time.
The left is resin and the right is polymer clay.  I had made cold porcelain My Melody but put it in a resin piece for testing. Same problem as the HKs.  I'll stick with cold porcelain or resin in the future.  
Same as above, though I painted a little bit of the resin (left) and it looks just fine.  
The left is resin and the right is polymer clay.  I just love love love the resin one in this case.  I think I'll just stick with resin for future butterflies.

It's pretty clear I'm having a love affair with resin right now.  There's still PLENTY of reason to use polymer clay (anything that can't be put into a mold), but for my molds I'm turning more and more to resin.  Resin has two strikes against it: cost and time.  In comparison to clay (maybe an hour to create, fire and glaze...depending on the item), it takes an eternity (at least two days). Cold porcelain is great for solid color pieces (you have to add paint to color it) but it shrinks when it dries and dries relatively quickly (though takes a day or so to cure completely).

Tuesday, July 17, 2012

My Crafty Summer - Day 17 - Finished Adventure Time Chibis

I didn't want to show these to you guys, but I said I would even show the stuff that embarrasses me.

For the most part, I liked the way these turned out.  I had a few problems along the way, notably waiting too long to bake them so they got a little dusty and manhandled by curious children.  I also made a style change to Marceline, moving her ax-bass to the front instead of the back.  Still, they were mostly ok until I drew their faces.  I love the way Princess Bubblegum turned out, Finn is missing something (maybe I should have included a shock of blonde hair) and Marceline's face is just atrocious.  Again, they were my first attempt so I'm not going to beat myself up about it too much, but I'd love to try again as well as make a Jake and Ice King...and maybe even a Lumpy Space Princess.  Once I'm past my resin obsession I'll get to work on them!

As for the faces, even after all that work making these things, you really only have one chance to draw their faces correctly.  It's a lot of pressure and even though I practiced before making my move, I still messed them up.  It's frustrating. Maybe next time I'll make their mouths and eyes with clay so that I can scrap it if it doesn't look right...something that's almost impossible to do with paint or Sharpies.

Other than finishing those up, I spent last night sanding some of the resin pieces.  I still haven't figured out what I'm going to do with the steampunk elements, so I think I'll just keep making and storing them until I'm inspired.


Monday, July 16, 2012

My Crafty Summer - Day 16 - More Resin

I made another video log entry today.  More resin experimenting over the weekend (yay!) while the husband ran child interference.


Saturday, July 14, 2012

My Crafty Summer - Days 10-15 - Resin!

Though it may seem like I have been idle, I have not!  After thinking about it for some time, and coveting some of the things I've seen online, I finally decided to try out resin.  I knew it could be a headache to work with, and so many things can and will go wrong, but I thought the resulting products could be gorgeous additions to my clips and jewelry pieces.

I haven't been posting because working with resin is time consuming...particularly for a beginner and especially for someone who won't work on it while her children are awake.   I knew I would talk about it all later and in the end I decided to just film a video.  I warn you now that it's very long and cut into two pieces because I'm spending more time crafting than trying to work with video software and YouTube.  Please take a look if you're interested and I'll add a couple photos here as well. 

I still have a long way to go before I'm any good at making resin pieces, but so far I like it a lot! Also, if any of my friends in the area come across stashes of stickers (particularly Sanrio aka Hello Kitty and the like, or San-X aka Sentimental Circus and etc.) or silicon ice cube trays (any shapes/sizes) or have any questions,  please let me know!


VBlog part 1 -
http://www.youtube.com/watch?v=n_sia4OzDK4

Vblog part 2 -
 http://www.youtube.com/watch?v=T2h9PnpQsXY


The resin I'm using at the moment. 

For the first batch, I used this resin mold as well as this silicone ice cube tray (Hobby Lobby and Meijer).

First batch: After the second pour and additives.


I shouldn't have added the resin and glitter at the same time.  The glitter just floated around.

Same here.

And here, plus these are over-filled.

As is this one. Embarrassing.

First batch: Dried but still tacky.  You can already see the massive crater from a popped bubble.

The other side.

The entire first batch.  I'm only happy with the butterfly cube.

The entire second batch.  I'm happy about all of these!

Love him.  The first layer was clear resin and eventually the stickers.  The second layer was clear with glitter on top.  I should eventually put in a third layer to even out the back.

The first layer of resin was mixed with pink glitter flocking powder.  The second layer was mixed with white resin dye.

The first layer was filled with shaped glitter.  The second layer was mixed with white resin dye.

One layer: Mixed with silver fine powder.

One layer: Mixed with white resin dye and red flocking glitter powder.

Two layers: Clear with sticker, then a layer of glitter, and then another clear.

One layer: Mixed with white resin dye.  I'm planning to use sharpies or other coloring instruments to decorate these.


Friday, July 6, 2012

My Crafty Summer - Day 9 - Butterfly Clips

Well, I am finally back to business.  Ribfest weekend always throws me completely out of whack with my regular schedule, but the final martini glass has been washed and put away and I can finally return to normal. :)

A friend of mine requested butterfly clips for portraits of her two girls.  I kept these simple, which hopefully is ok. I worked on these last  night and might be making different versions this evening.  I feel a little out of touch with clip making since I've been concentrating on polymer clay for so long.  Shame on me.